
In the Edain Mod, many mechanics are hidden deep within the code or just not clearly explained. This often makes it hard for new players (and even some more experienced players) to fully grasp everything that is happening on the field. Because the Edain Wiki is all about covering every aspect of the mod, these game mechanics are all listed below.
The Palantir of Command[]
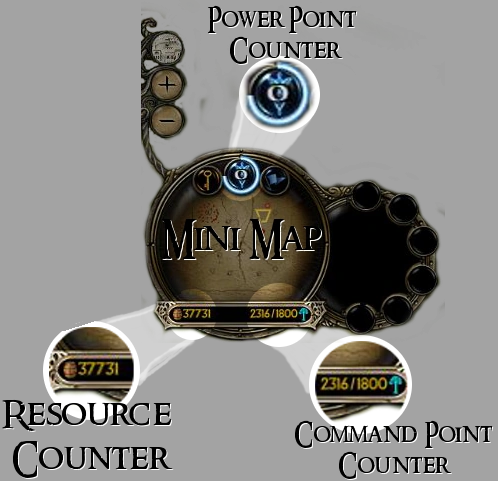
Command Points Counter[]
Command points (often abbreviated to CP) are the game mechanics that regulate the amount of heroes and units you can have. In skirmish mode (and other modes that don't affect the command points), you start with 500 and must increase that limit through pantry upgrades that can be bought on at the citadel or at the Sanctuary in the case of Lothlorien. CPs are located at the bottom right of your mini-map palantir. However, the maximum amount the CP limit can be increased to is 1500; beyond that, purchasing the pantry upgrade will not increase your CP limit. Because of the way that the CPs work (each unit costing a couple CPs instead of entire battalions) it is possible to exceed this limit. Simply lose enough units without losing the battalion and keep training battalions, then simply heal or buy banner carriers and your battalions will regenerate.
Power Points[]
Power Points (often abbreviated to PP) are points you gain throughout the game by battling, whether it's simply trading blows with enemy heroes, killing enemy troops, slaying neutral creeps or reducing enemy buildings to rubble. These PPs can then be accessed by clicking on the PP counter, which gives you access to your chosen faction's spellbook. To see each faction's spellbook simply pick a faction and scroll down to the spellbook section. The spells, once purchased, will then appear on the side of your screen and can be used immediately but must then cool down. Passive powers such as Gandalf The White or His Deadliest Servants will be in effect as soon as they are purchased (passive powers). The powers are classed into 4 Tiers from 1 to 4 depending on their level in the spellbook. Here are the costs break up:
- Tier 1: 1-2 PP
- Tier 2: 2-4 PP
- Tier 3: 6-7 PP
- Tier 4: 9-10 PP
Most spellbook powers do not deal direct damage and instead tend to focus on supporting your troops in various ways.
Resources[]
Resources are the amount of money that the player has at that moment. You can gain resources from resource buildings (e.g. Isengard Lumber Mills, Mordor Slaughter Houses and Rohan Farms), treasure from lairs, or from certain units and heroes (Bilbo can drop treasure for one of his abilities, while some heroes and units have a Scavenger ability that allows them to gain money from kills). Money can be used in game for buildings, unit production, hero production and upgrades. The amount of money you earn from buildings can be increased by purchasing Resource Production upgrades or from certain powers (like Isengard's Industry and Fuel the Fires). Since having a strong economy is necessary to do well in the game, many players attempt to harm the economy of their opponents by destroying resource buildings and making them waste money.
Stances[]
Stances are a new feature added in BFME2, where the first slot of every unit and heroes palantir will be a set of three interchangeable stances which slightly increase and decrease attack and armor along with changing the agro level of the unit/hero. This does not affect heroes with custom stances such as Helegwen, Denethor or The Necromancer who each get a different stat increase stated in the description. The player must pay attention to the fact that stances are not advantageous on the long term. For example, a battalion of Swordsmen set in aggressive stance fighting against a similar battalion will lose because the debuff in stat(s) is greater than the buff into the other stat(s). You should rather use the stances for precise goals, the default stance should be the normal stance.
Defensive Stance[]
The Defensive Stance set the agro level of the unit or hero to passive meaning that the unit or hero will not engage the enemy unless it engages it first. In addition, triggering the stance will immediately bring the hero/unit to a halt and grant the following stats increase and decrease for each type of unit:
Swordsmen
- Armor: 15% increase.
- Damage: 20% decrease.
Archers
- Armor: 10% increase.
- Damage: 15% decrease.
Heroes
- Armor: 10% increase.
- Damage: 15% decrease.
Siege (Artillery)
- Armor: 10% increase.
- Damage: 15% decrease.
Pikemen
- Armor: 15% increase.
- Damage: 20% decrease.
Cavalry
- Armor: 10% increase.
- Damage: 15% decrease.
Strategy
This a good stance to use if your units are being attacked by archers. If you have swordsmen or cavalry charging enemy archers put them in this stance until they reach the archers. Once they reach the archers put them in normal or aggressive stance for maximum damage output.
If you are leaving a unit as a sacrifice put it in defensive stance so it will survive longer. This is also useful if you are going to reinforce your army, you can keep the few battalions in defensive stance until your army arrives. If the enemy is having all of his army focus on one of your battalions put that battalion in defensive stance so it will survive longer while your other battalions deal the damage.
Uruks and Gondor soldiers in shield wall with defensive stance on can take a lot of beating before they die. They make EXCELLENT meatshields! Defensive stance is useful for units with high attack. They can still get 1-2 hit kills while taking little damage. If you have some swordsmen that are about to be hit by cavalry put them in defensive stance. Once the cavalry hit and slow down, put your swordsmen in aggressive stance then kill the cavalry. If your archers are about to be hit by cavalry put them in defensive stance.
Right after your cavalry are done trampling enemy units, put them into defensive stance. When cavalry trample enemy units, those units deal crush damage back. Putting your cavalry into defensive stance immediately after they hit enemy units will help keep them alive for a much longer period of time.
When out of combat put wounded heroes in defensive stance to help them regenerate health faster.
Normal Stance[]
The Normal Stance does not affect the stats of the unit/hero and they will engage enemies that appear in a medium range.
Agressive Stance[]
The Agressive Stance set the agro level of the unit or hero to agressive meaning that the unit or hero will engage all enemies that appear in its vision range (there is a difference between global vision range and a single unit's which explains why units don't always engage units the player can see). In addition, triggering the stance will grant the following stats increase and decrease for each type of unit:
Swordsmen
- Armor: 20% decrease.
- Damage: 15% increase.
Archers
- Armor: 15% decrease.
- Damage: 10% increase.
Heroes
- Armor: 15% decrease.
- Damage: 10% increase.
Siege (Artillery)
- Armor: 15% decrease.
- Damage: 10% increase.
Pikemen
- Armor: 20% decrease.
- Damage: 15% increase.
Cavalry
- Armor: 15% decrease.
- Damage: 10% increase.
Strategy
Put your cavalry in attack stance before you hit a group of unprotected archers. Put your archers in aggressive stance When they are attacking enemy units/buildings and are not being attacked back. When you want to kill something quickly put your units in Aggressive Stance. Use aggressive stances when you have units attacking enemy resource buildings. Be careful as units in aggressive stance will take a lot more damage from everything, although if you are attacking a hero who can one-hit your units it doesn't matter.
Stats[]
Attack Speed[]
The Attack Speed of a unit defines how often they attack when uninterrupted. The following are some rough estimates to help you contextualize the attack speed of specific units:
- Very Fast: 1000
- Fast: 1500
- Average: 2000
- Slow: 3000
- Very Slow: 6000
Movement Speed[]
The Movement Speed of a unit defines how quickly they move around the map when unhindered and unaided. The following are some rough estimates to help you contextualize the movement speed of specific units:
- Very Fast: 120
- Fast: 80
- Average: 55
- Slow: 40
- Very Slow: 15
Range[]
The Attack Speed of a unit defines how far away a unit can attack their target from. The following are some rough estimates to help you contextualize the range of specific units:
- Siege Range: 600
- Long Range: 400
- Medium Range: 300
- Short Range: 200
- Melee: 30 and under
Veterancy[]
Heroes and units gain experience points through killing units, building and the use of certain abilities (Drauglin's Beastmaster for example). When they reach a certain amount of points they gain a level, gaining increased stats and sometimes unlocking new, powerful abilities to use in battle. When a hero dies, they retain their level and experience, however, when a unit dies all experience and levels are lost forever. Each level requires more experience points than the last and bring additional stats bonus and abilities. Heroes can usually level up to level 10 and units can usually level up to level 5.
Heroes and units have different requirements for the amount of experience required to level up. Units are split up based on their type (pikemen, swordsmen, archer, single, ect...), battalion numbers (how many units each battalion contains), their alignment (good, evil) and tier (normal, elite, heroic). All units in the same category, e.g normal good 15 unit swordsmen battalions (Gondor Soldiers, Rohan Peasants), have the same experience requirement. Monsters and single units have their own categories which are only based on their alignment and their tier.
Heroes are categorized somewhat more arbitrarily, heroes are categorized by their alignment and as either one of the following:
- an archer hero (helegwen, halbarad, faramir, ect...)
- a scout hero (Bilbo, Drauglin, ect...)
- a wizard hero (gandalf, saruman, galadriel, ect...)
- a monster hero (treebeard, mollok, shelob, ect...)
- a warrior hero of one of three tier
- a weak warrior (nori, gloin, eowyn, orophin, arwen, gothmog, ect...)
- a normal warrior (glorfindel, arvedui, thranduil, imrahil, ect...)
- a strong warrior (elrond, dain, theoden, thorin, ect...)
Each of these categories have different exp requirements and gain different amount of rewards from leveling up. Below a table will attempt to explain how much each category gains per level.
Hero Level Up Bonus[]
Heroes are split up in different categories but as of Edain 4.4.1 all gain the same bonuses from level up which is split up into three stages, each bonus is applied to the current stat, not to the base stat. From level 2 to 5, heroes gain the following stats when they level up:
- +5% Spell Damage
- +5% Weapon Damage
- +5% Health Damage
Once they reach level 5 and all the way till they hit level 10, heroes gain the following bonus to their stats when they level up:
- +2% Spell Damage
- +2% Weapon Damage
- +2% Health Damage
For example, Glorfindel's stats for each level are as follows:
| Level | Health | Damage |
|---|---|---|
| 1 | 5500 | 360 |
| 2 | 5574 | 378 |
| 3 | 6063 | 397 |
| 4 | 6366 | 417 |
| 5 | 6685 | 438 |
| 6 | 6952 | 455 |
| 7 | 7230 | 473 |
| 8 | 7520 | 492 |
| 9 | 7820 | 512 |
| 10 | 8211 | 538 |
Units Level Up Bonus[]
Likewise, while units are split up into a lot of different categories to make them easily to identify uniquely, they receive more or less the same bonus from leveling up. Normal and elite swordsmen, pikemen, archers, cavalry, single units and "good" monsters (Ents) gain +15% damage and health with each level. Heroic swordsmen, pikemen, archers, cavalry, single units and "good" monsters (Ents) gain +10% attack and health from level 1 to 5, then they gain +8% damage and health from level 5 to 9, and then finally upon reaching level 10 they gain another +10% damage and health. Veterans of the Last Alliance also gain +10% damage and health from level 11 to 14, +8% damage and health from level 15 to 18, and finally +10% damage and health from level 19 to 20.
Normal, elite and heroic "Evil" monsters (Trolls) gain +10% damage and health from level 1 to 5, heroic "Evil" Monsters also gain +8% damage and health from level 6 to 9, and +10% damage and health upon reaching level 10.
The 4.5 Uruk Hunters are the only exception to the rule, gaining double the bonus in the early levels. Uruk Hunters gain +30% damage and health from level 1 to 5, and then gain +15% damage and health from level 6 to 10.
Armor Sets[]
Armor Set defines how much damage the unit takes from each damage type (see below). Instead of individually defining the values for each unit, BFME uses these Armor Sets and assigns them to units. In this manner whatever change is made to the original Armor Set will then be automatically transferred over to the units which have been assigned the modified Armor Set, just like the templates on the wiki.
The armorset of a unit dictates how much damage they take from each damage type. For example, if the armor set says that a unit takes 75% of SLASH damage and an enemy attacks it for 20 SLASH damage, the unit will only lose 15 hitpoints.
- For formatting reasons the armor sets are on another page, click here
Damage Types[]
The list below outlines all the possible damage that can be taken. They are listed in the Armor Set, and therefore the percentages define the multiplier of the damage dealt out.
DEFAULT
This type of damage specifies how much of the damage is taken by the unit for any type of damage that is not written out. For example, if CRUSH damage isn't specified in the Armor Set then the game will refer to the value of DEFAULT to know how much of the damage to inflict.
UNDEFINED
Damage type not defined, refers to DEFAULT.
CAVALRY
This type of damage specifies the damage taken by the Armor Set from the Cavalry Melee attack. This must not be confused with the trample damage which is explained in CRUSH; this damage is purely dealt every time a cavalry unit strikes.
CRUSH
This type of damage specifies the damage taken by the Armor Set from being trampled by units. Armor Sets made for Monsters and Cavalry often have it set to 1%.
CAVALRY_RANGED
This type of damage specifies the damage taken by the Armor Set from Mounted Archer attacks. However, it is not always the case. It is especially effective against units with heavy armor but it is not as strong as the URUK damage type.
SIEGE
This type of damage specifies the damage taken by the Armor set from Siege attacks. (note: Saruman's fireball does siege damage)
STRUCTURAL
This type of damage specifies the damage taken by the Armor Set from the arrow towers of each faction. This includes the buildings that gain arrow towers through their upgrades, the buildings that can be manually upgraded with arrow towers and the defense towers that can be built on plots and defensive plots.
CHOP
This type of damage is only specific to some units as not all units of one category can deal that type damage. It specifies the damage taken by the Armor Set from units with the CHOP damage. This deals more damage to units without the Heavy Armor upgrade.
FLAME
This type of damage specifies how much damage the Armor Set takes from fire attacks such as fire arrows, fire stones and Saruman's Fireball fire damage, which is not the same as the initial impact which is categorized as SIEGE damage.
FROST
This type of damage specifies how much damage the Armor Set takes from frost attacks such as the Avalanche, the Ice Arrows or the Ice Shots.
URUK
This type of damage is only specific to some units as not all units of one category can deal that type of damage. It defines how much damage is taken by the Armor Set from units with the URUK damage type. This deals more damage to units with heavy armor.
POISON
This type of damage specifies how much damage the Armor Set takes from heroes and units that have poison damage (Gorbag's attack, Shelob's attack, Dol Guldur units). However, it doesn't specify how much damage over time is taken.
WATER
This type of damage specifies how much damage the Armor Set takes from Monster attacks. This includes everything that is not a building, in which case you must refer to the SIEGE damage type.
SLASH
In Edain, and BFME in general, SLASH is the damage that sword wielding infantry deals.
PIERCE
In Edain, and BFME in general, PIERCE is the damage that bow wielding infantry deals.
MAGIC
In Edain, and BFME in general, MAGIC is the damage dealt by abilities of magical nature. Such as Gandalf's Wizard Blast or Saruman's Fireball. Not all abilities deal magical damage.
HERO
In Edain, and BFME in general, HERO is the damage that melee heroes deal.
SPECIALIST
In Edain, and BFME in general, SPECIALIST is the damage the pikemen and spear throwing infantry deals.
HERO_RANGED
In Edain, and BFME in general, HERO_RANGED is the damage that ranged heroes deal.
REFLECTED
In Edain, and BFME in general, REFLECTED damage is the damage taken by units when they attack an enemy which has as ReflectDamage module defined.
LOGICAL_FIRE
In Edain, and BFME in general, LOGICAL_FIRE is the damage that flaming ground deals when units stand in it..
Unused Damage Types in Edain[]
HEALING
IRRESISTIBLE can't be influenced by any modifiers or armor
PENALTY
FALLING
TOPPLING
PASSENGER
FLY_INTO
FORCE
Further Damage Effects[]
FlankedPenalty
A Modifier which increases the damage, when being attacked from the sides or behind, the damage type is nonetheless one of the above
CrushedRevenge
Damage taken cavalry will take from trampling this unit, but the damage type is one of the above
Fear and Fear Resistance[]
Fear is a powerful move in Edain, allowing players to slow their enemy, make them flee the field or even immobilize them completely. However, there are many more effects than one could usually think, it isn't a simple fear indicator, there are actually 4 different ways to stun an enemy:
- Fear: enemies cower on the floor, for example Boromir's Horn.
- Terror: enemies run away cowering, for example the Screech of the Nazgul.
- Paralyze: enemies are stunned, for example Soul Freeze.
- Slow: the movement speed is set to 0, for example Lurtz Cripple Strike.
Fear and Terror can be countered by Fear Resistance abilities such as the Spellbook Horns or any leaderships that states it grants "fear resistance". Paralyze cannot be countered at all and Slow can only be countered by it anti-category, if the anti-category is active then the Slow won't work.
Trampling[]
Trampling is an ingame mechanic shared by most Monster and Cavalry, but that can also be granted to certain units through the use of abilities such as Arvedui's Bulwark or The Unburnt's Charge Attack. When a unit tramples an enemy the enemy will be knocked back and suffer damage, the damage amount entirely depends on what units is doing the trampling but it will often be of CRUSH type. Each time the unit tramples an enemy they slow down a bit (deceleration) and take some damage (crush revenge) once they fall below a certain speed they will stop trampling but be enable to regain speed for as long as they are surrounded by units. If a unit gets stuck they become easy prey for any enemy, they will only be able to start picking up speed once they have manage to get themselves out of the battalion in which they are. For this reason, it is not recommended to charge head in, Theoden style, into the enemy front line. Rather you should aim for isolated battalions or squishy backlines, if neither are available try clipping the edge of the enemy formation. In most cases, heroes, monsters and cavalry cannot be trampled, the exception being Mumakil and Grond which deal damage to anything they run over.
Trample Revenge Damage[]
Trample revenge damage, also known as revenge damage or crush revenge, is the damage dealt to cavalry and monsters when they trample units. It is meant to represent the wounds sustained from charging head into armored and armed troops with lots of pointy bits. The units that deal the most revenge damage are Pikemen and spear wielding infantry such as Rohan Spearthrowers, Archers and Swordsmen deal very little trample revenge damage, just enough that the enemy can't just trample ad infinitum but not enough to be a serious threat within a battle. Units that cannot be trampled do not slow down enemy tramplers or deal revenge damage.
Deceleration[]
Units can only trample enemies if they have enough speed, usually just a couple meters is enough to pick up the speed needed to trample, however, upon contact with enemies, units will start to lose speed for every units hit without regaining any as they travel. This is known as trample deceleration. Trampling units will continue to decelerate all the way to almost a standstill for as long as they are surrounded by enemy units which they can trample, however, below a certain threshold they will no longer deal damage or knockback but continue to decelerate. If the units are stuck in the middle of a group of enemies, they're as good as dead, unable to escape and at the mercy of the enemy troops, of course they can try to fight but cavalry in Edain isn't built for sustain but rather shock combat apart from a few exceptions. If a unit manages to free themselves they will quickly pick up speed again and can start trampling as soon as they run back in.
Monsters and single units usually do not decelerate as much but for them the consequences of decelerating are much more dire since they cannot rely on just having a single unit escape in order to regenerate the entire battalion.
Leadership[]
Inflation[]
In the recent 4.5 patch, Edain introduced or rather re-introduced a mechanic from vanilla ROTWK: inflation. This was part of their recent efforts to make comebacks from losing mechanics possible by lessening the impact of map control and of a superior economic advantage. In the past a player that had won early battles could build additional economy buildings on external plot and take an early lead that had a tendency to snowball completely out of control, now, with every building that the player purchases ALL economy building produce slightly less. Which means you still have a higher cash flow than before but just not as much. Below you can see a graph showing at what percent of efficiency all buildings produce based on how many you have. For example, if you have 8 buildings they all produce at 85% efficiency, say each building produces 32 resources per tick, then you will be making (32 * 8) * 0.85 = 218 resources per tick (a resource tick is approximately 15 seconds. In 4.4.1, a player with the same settings would have been making 256 resources per tick.
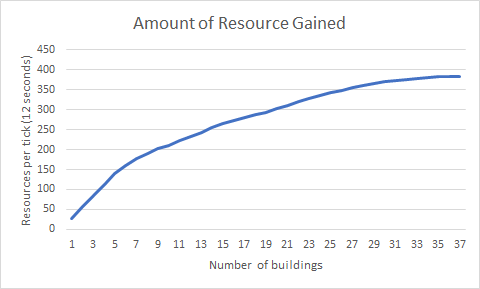
Inflation is indicated on buildings affected by it with the following passive titled "Supply Routes"
![]() Supply Routes - As you build more economy structures, their individual production becomes less efficient. Once you reach a certain threshold all economy structures will produce less.
Supply Routes - As you build more economy structures, their individual production becomes less efficient. Once you reach a certain threshold all economy structures will produce less.
- 5 economy structures or less: 100% production
- 10 economy structures: 84% production
- 15 economy structures: 69% production
- 20 economy structures: 56% production
- 30 economy structures: 49% production
- 37 economy structures or more: 44% production
Each building you build is added up and compared against the following set:
100 100 100 100 100 97 94 91 87 84 81 78 75 72 69 66 63 60 58 56 54 52 51 50 49 48 47 46 45 44 43 42 41 40 39 38 37
For example, building 6 buildings will land you on 97%, hence all buildings will produce at 97% efficiency.
Cooldowns[]
Cooldowns are a specific amount of time that the player must wait before being able to use the same ability or spellbook power. They can be increased or reduced by certain abilities or even reset or triggered by other abilities. When a cooldown is triggered by something like the Witch King's Terrifying Malice ability all the affected abilities will begin to cooldown as though they had been just used. If the cooldown are reset, all the cooldowns will be set to 0 and the ability can be used again.
When a spell or ability says that it will increase or reduce a cooldown's time it specifically means that if the hero/unit is under the effect of the spell and ability when it triggers the cooldown and only then the cooldown will be affected. Once cooldowns are started they cannot be affected, therefore, casting an ability that reduces cooldown timers on a hero that already has all their ability on cooldown will not have any effect. In order for the time reduction/increase to work, the ability must be used while the hero is under the effect.
For example, Halabard's Banner Passive when summoned by Gondor. If you use an ability and then summon him, that ability will not cooldown faster, however, if you summon him and then use the ability then it will cooldown faster, even if Halbarad's passive stops affecting the hero halfway through the cooldown.
Once a cooldown is started, it cannot be reduced or increased, it can only be completely reset or restarted.
Unit Types[]
Nearly all units can be split into different categories. Heroes are special units that are based on characters from The Lord of the Rings and the Hobbit. They have specific abilities and uses and are a lot more powerful than regular units. Swordsmen are the basic units for most factions and are usually well-balanced. Archers are damage dealing units with the ability to attack from far away. However, they have reduced armour to compensate. Cavalry units are fast, strong, and able to damage other units by riding over them. However, if they are forced to trample too many units at once, they slow down and are vulnerable to attack. In addition, for every unit they trample they take a small amount of "revenge" damage. Monsters are powerful single units that can devastate armies if not put down quickly with the appropriate counter. They are strong with specific uses that allow them to deal massive damage to enemy forces and buildings. Pikemen are specialized units that deal very high damage to monsters and cavalry, in addition, in 4.5, pikemen also deal bonus damage against structures. Support units have little or no attack capabilities but have special abilities that let them boost the skills of surrounding units. Finally, Siege units are designed to bring down buildings and are less effective against regular units.
Each type of unit category is weak against another. Swordsmen are weak against cavalry due to the mobility differences and the trample. Cavalry is weak to pikemen and monsters, while monsters are weak to pikemen and upgraded archers. Siege units are weak to all melee attacks. Every unit but siege is weak to the damage dealt by archers, unless specifically stated otherwise, but will win easily if they manage to engage in melee combat
In order to do well in a game, a player must ensure that they have a balanced army for all situations and that they know how to use each unit type.
Tiers[]
All units fit into either of three tiers: Normal, Elite and Heroic which is broadly defined by their stats, ease of access and price. The easiest way of figuring out a unit's tier is through their prices:
- battalions that cost under 500 resources are usually Normal
- battalions between 500 and 1000 are Elite
- battalions over 1000 are Heroic
- monsters under 1000 are Normal
- monster between 1000 and 2000 are Elite
- monsters above 2000 are Heroic
Elite units are like standard units that are a lot stronger and may have additional abilities. They are usually used in the mid-late game, they are somewhat resistant to their counter unit type but still vulnerable to them. Heroic units are limited, expensive units that are very powerful and have extra abilities to destroy enemy forces. In addition, heroic units don't always follow the rules of unit types listed above: Lindon Guardians are archers and yet it is very hard to kill them by trampling, in addition they can switch weapons and the hunter may suddenly become the hunted.
The weaknesses of elite units and heroic units are dependent on what type of unit they are, although they usually require other heroic and elite units to fight them one on one. Heroes are also useful given that they are not focused, archers can do a decent job if they all focus fire a single battalion and of course any units will die if you throw enough troops at it.
Game Modes[]
The Edain Mod took away the old CP multiplier and replaced it with a series of interesting and unique game modes which can be picked before the beginning of the game.
Massacre
In this gamemode you start with 500 CP and you cannot purchase any more. Heroes lose 25% armor while units lose 50% armor.
Elite
CP gained from Expanded Storeroom is set to 50 but troops are twice as strong.
Skirmish
Standard settings: players will start with 500 command points and all units and heroes will have their regular stats. The maximum command points a player can have in this mode is 1500, which is generally enough to amass a decently large army.
Victory Points
In Victory Points mode, the player must hold more than half the outposts for 8 minutes. As soon as the player controls more than half the outposts, a countdown will begin. However, if the player loses that ground the countdown will stop and reset.
Conquest
In Conquest mode, the goal is to hold more than half the settlements for 4 minutes. As soon as the player controls more than half the settlements, a countdown will begin. However, if the player loses that ground the countdown will stop and reset.
Legendary Heroes
As the name indicates, heroes gain a minor increase to health, damage, and armor, making them slightly more resistant to enemy units. However, this does not, by any means, make the hero units of this mode any more powerful than they would be in the base game.
Epic Battle
In Epic Battle the starting CP is 500 and the max CP is 150,000. In this gamemode, each Expanded Storeroom upgrade grants 30,000 CP, this should be enough command points to make an army that can conquer Middle-earth twice over. Be careful however, such a gamemode can lead to crashes especially as players go above the normal 1,500 command point cap.
Shortcuts[]
Shortcuts in Edain are completely standardized according to the German Keyboard, which might make them a bit more complicated to use on keyboards of other languages but they remain completely usable. The shortcuts in Edain follow a simple pattern based on the palantir slot the ability is in:
In the case of particularly large palantir, such as for buildings, palantir spots after the first five will be assigned the following keys:
- 6: N
- 7: A
- 8: S
- 9: D
- 10: F
- 11: G
In addition to the shortcuts for each unit, hero, abilities and buildings some shortcuts are universal and allow for quicker and more precise strategies, they are all listed below:
| Name | Key | Useable In | Effect |
|---|---|---|---|
| Save View1-9 | Ctrl + F1-F9 | Game | Saves your current perspective so that clicking on the number you used to save it will bring up that perspective. |
| View View1-9 | F1-F9 | Game | Automatically sets your perspective to the one you saved on that number. |
| Create Team0-9 | Ctrl + 0-9 | Game | Sets as the units selected as team X |
| Select Team0-9 | 0-9 | Game | Selects units previously set in team X |
| Add Team0-9 | Shift + 0-9 | Game | Add the selected units to team X |
| View Team0-9 | Alt + 0-9 | Game | Shifts the camera straight to the majority of the troops in group X |
| Select Matching Units (on screen) | E (single tap) | Game | Selects all the units of the same type as the currently selected units on the screen |
| Select Matching Units (map wide) | E (double tap) | Game | Selects all units of the same type as the currently selected units on the whole map |
| Select Hero | Ctrl + H | Game | Selects a nearby hero, repeatedly clicking on Ctrl + H will select recruited heroes one after the other |
| View Home Base | H | Game | Moves the camera to the citadel of your starting base |
| View Last Event | Space | Game | Moves the camera to the last radar event (mostly used when Gollum is sighted) |
| Select All | Q | Game | Selects all units and heroes present on the map |
| Scatter | R | Game | The selected battalions scatter away individually |
| Stop | S | Game | The selected battalions will hold positions and attack any unit that come within their attack range |
| Attack Move | A | Game | The selected battalion will move towards the clicked point attacking all units within their range |
| Chat Allies | Backspace | Game (Multiplayer Only) | This will open up a text bar that will allow the player to send a message only seen by players on the same team |
| Chat All | Enter | Game (Multiplayer Only) | This will open up a text bar that will allow the player to send a message seen by everyone |
| Diplomacy Screen | Tab | Game | This will open up the diplomacy screen to let you see player still playing and donate resources to your allies. |
| Place Beacon | Ctrl + B | Game | Place a beacon on the clicked location to signal to allies |
| Sell/Delete Beacon | Escape | Game | Deletes the selected beacon or destroys the selected building (except the citadel) |
| Menu | Escape | Game | Opens the game menu (does not pause game in multiplayer) |
| Control Bar Toggle | F9 | Game | Hides/Unhides the control bar |
| Continuous Selection | Shift + Left Click | Game | Allows the player to add units to the current selection by clicking on them |
| Screenshot | F12 | Game | Takes a screenshot of the screen and saves in the Rise of the Witch King Screenshot folder (in Images) |
| Movement Path | Alt + Right Click | Game | Creates a path for the selected units which they will follow. Can be used for patrolling |
| Select Special Unit | B | Game | Iterate through all the special units present on the battlefield. This is for units that appear in the hero bar such as Elven Minstrels or Angmar Tributes |
| Select All Heroes | O | Game | Select all your heroes present on the battlefield |
Computer Players[]
In skirmish mode, the player faces off against any number of computer players (also called AI or simply referenced with the difficulty level "Brutal", "Medium" or "Easy") on a variety of maps. If desired, a skirmish game can be played in which no computer opponents are present, allowing for the player to freely explore the mechanics of a faction without a time limit or victory condition.
Computer players have always been programmed somewhat poorly. For one, none of the AI opponents ever have a method of gameplay that suits the nature of their faction, which leads to Gondor computers being unnaturally aggressive, and Rohan computers swarming with peasants instead of attacking strategically with cavalry like they could. Computer opponents tend to favor more aggressive and basic methods of warfare by sending swarms of foot soldiers to capture outposts and settlements, and making beelines straight for the player's citadel whenever possible. This can lead to them getting their own men killed by a plethora of arrow towers, or by monsters and enemy units who happen to graze by them. To make up for this artificial stupidity, the AI is always given a sort of advantage over the player, in the ways of having much more resources and command points available; so no matter what, AI opponents will always have larger and better-equipped armies than the player, even on easy mode, and especially during the late game.
The only way to really counteract this is to set computer opponents on harsh handicaps to severely weaken all of their units and buildings. Besides this, the only real difference shown in the AI depends on their difficulty setting. Computer opponents at higher difficulties barely show any increase in tactical skill, but instead are given artificial strength in the form of even more free resources and command points, as well as free power points, allowing them to spam their spellbook powers from the beginning.
There is no hope of fixing these computer players, ever. If someone tires of dealing with the frustration of fighting computer opponents, they may have better chances of playing Edain Mod against other players via Gameranger.